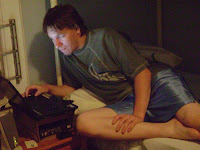
The very first thing you'll need to do is ensure all your family is otherwise occupied. For example, I had to make sure last night that my husband was on the bed, happily playing on the laptop. He truly is a wonderful man who supports me in all my creative endeavors, even though he "sometimes" threatens to cut off my crafting supplies if I don't sell more ACEOs!

I also had to ensure that little baby Kyle was blissfully in his own crib.
Once my loving family was where they all belonged, it was time to gather the materials I might use. As I said earlier, you can use just about any materials you can imagine to make ACEOs. The sky is the limit! But one thing I definitely recommend is

After you have gathered all your materials, you are starting with a fresh, clean card. Half the fun of making these cards is deciding how to make your next one! For the purposes of today's tutorial, however, we are going to make a

I took my newest set of clear stamps, "Coastal Clear Stamps" by Inkadinkado, and attached them to a thin acrylic block. I really love the versatility of clear stamps. I feel they give as much detail as the wooden ones, and they are a lot less expensive. And the designs are endless!
I then inked the stamp with a funky new ink by Tim Holtz, called Distress Ink. This one is "Broken China", and gives the effect of broken china! It is not easy to see from this picture, but the ink really is cool. I stamped the top of the card and the bottom.
After inking the shell design, I proceeded to cut two strips of thin blue ribbon and attach them lenghtwise to the card with glue. The strips were longer than the card itself, so you can cut off the excess once the glue dries. I used a blow drier to help the drying time.
Then, I cut a small block of designer paper that I thought would accent the blue ink. I glued that block to the card, and stamped different shells with black ink right onto the square.
Once that was done, I took a sticker of a B with a small seashell on it and attached it to the card. Then, I used two Gellyroll Stardust pens (blue and green) to write the rest of the word beach. 
I also used the two Gellyroll pens to accent waves along the top and bottom of the card that I made with black marker.
And there you have it, my finished ACEO "Beach Day". I am happy with the way it turned out, and I only ate half of the chocolate bar!
I encourage you all to try and make some of these fantastic cards. I really enjoy creating them, and the feeling when they turn out better than you hoped is very rewarding. Please leave me any comments if you have any questions about making them, and above all else, remember to enjoy yourself! The creative process can be so much fun if you do it right. With chocolate!
3 comments:
What an adorable ACEO! I loved your tutorial, especially the steps involved in making sure those 2 handsome men in your life are properly occupied! :-)
I think I may have discovered why I've been having a little trouble with artist block here lately. NO chocolate!!! What was I thinking?! (Headed out on an emergency run to the local Save-Rite right away)!
Great blog! :)
love this! you are so cute :)
Post a Comment